Index:
Setting up your Droppa Shipping account
Funding your Droppa wallet
Enabling the Droppa Shipping app in your Netcash Shop
Setting up shipping zones and your collection address
Other additional settings
Testing your Droppa Shipping app in your store
Processing orders in the Droppa app
Tracking your orders
Cancelling an order
Getting help
Removing or disabling the Droppa Shipping app
Setting up your Droppa Shipping account
To use the Droppa app in your Netcash Shop, you’ll need to create a Droppa Business Account.
- Visit the Droppa site to begin your account setup.
- Follow the sign up process and add your company details.
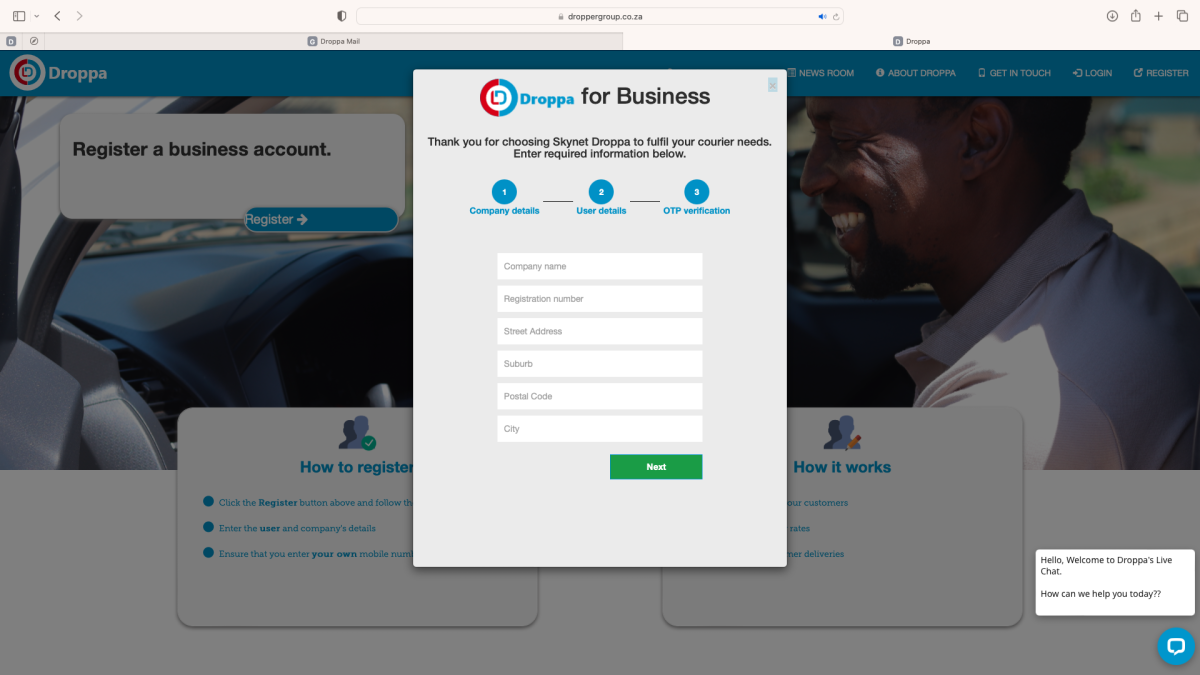
3. Next add your personal details.
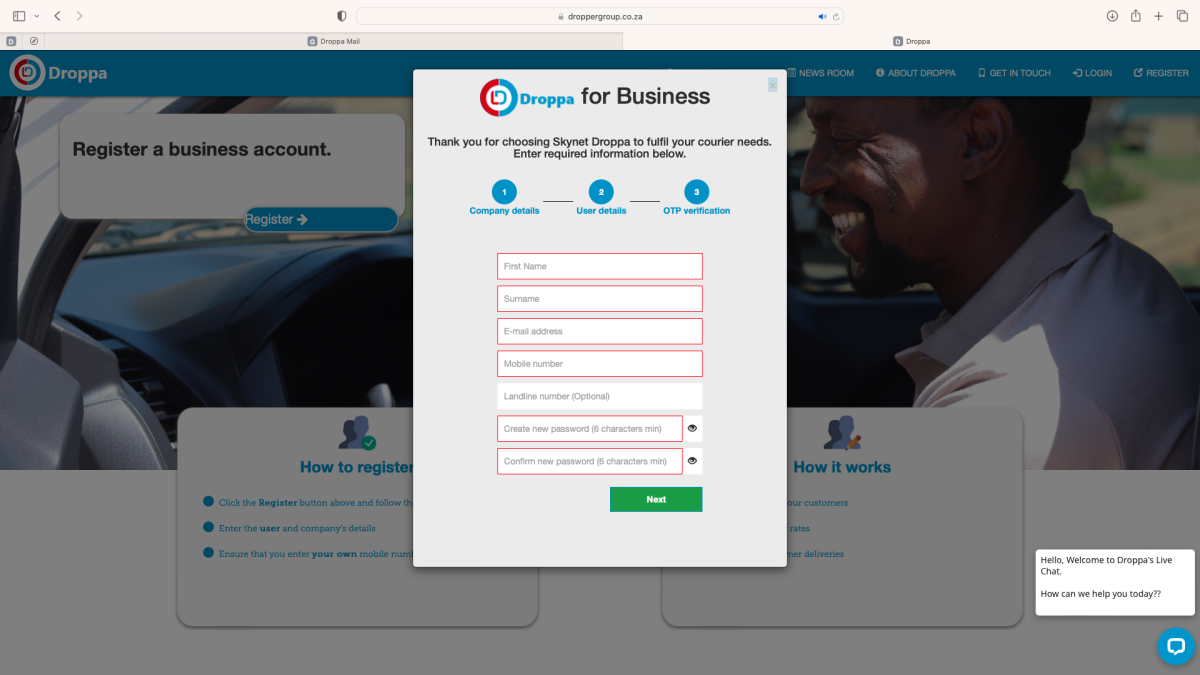
4. Once completed, you will receive an OTP from Droppa to complete the registration process.
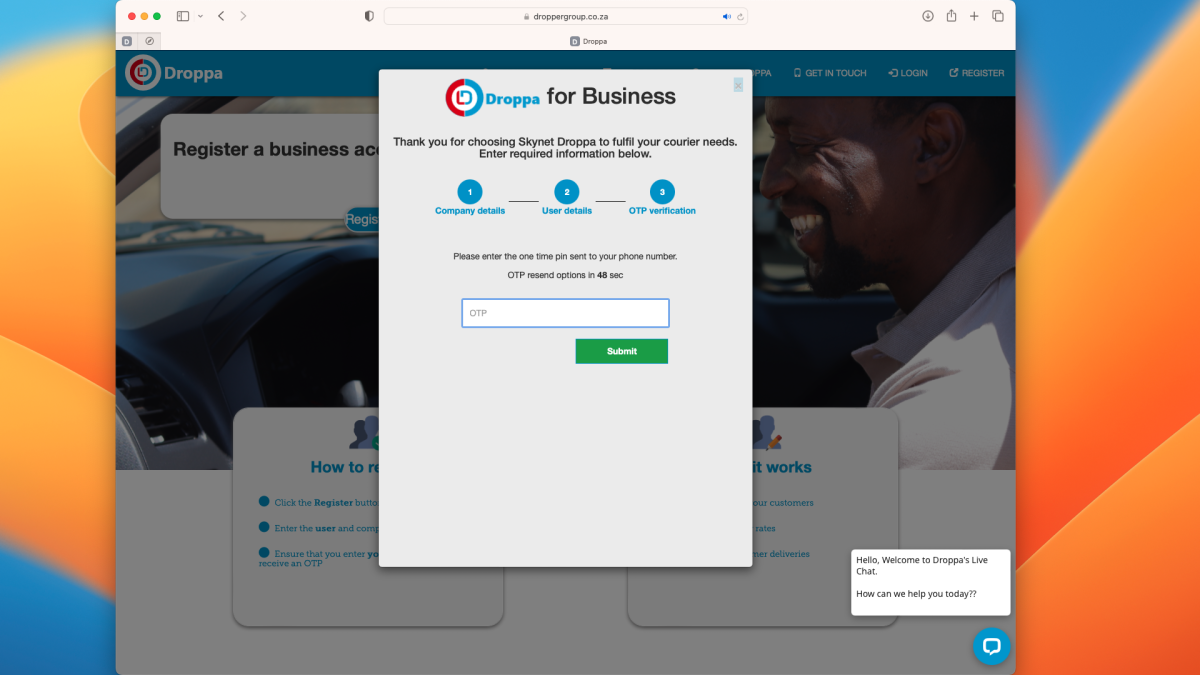
You’ve now created your Droppa account where you can view your parcels in various delivery statuses, top-up your wallet to pay for your shipping fees, and more.
Funding your Droppa wallet
Droppa works on a pay-as-you-go basis, so you can choose how much you’d like to spend on courier fees at any time. To process orders in your Netcash Shop with Droppa, you need to have enough funds in your wallet to cover the delivery fees.
To top-up your wallet:
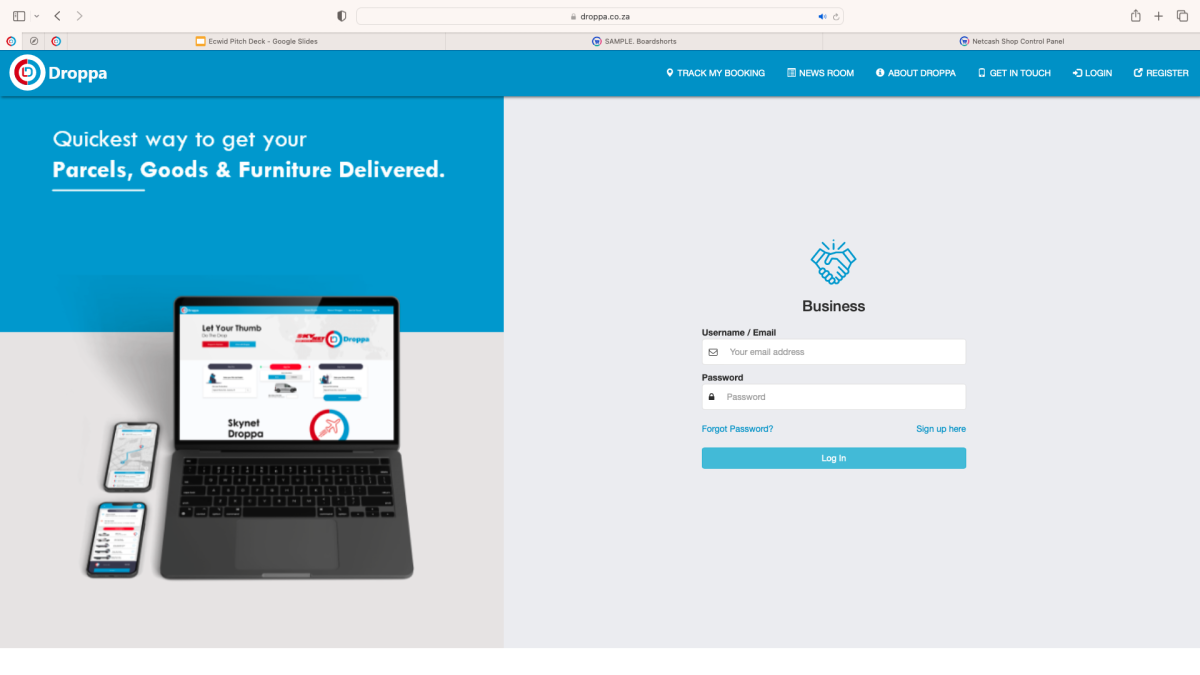
- Sign in to your Droppa account using your business account details.
2. Select wallet top-up
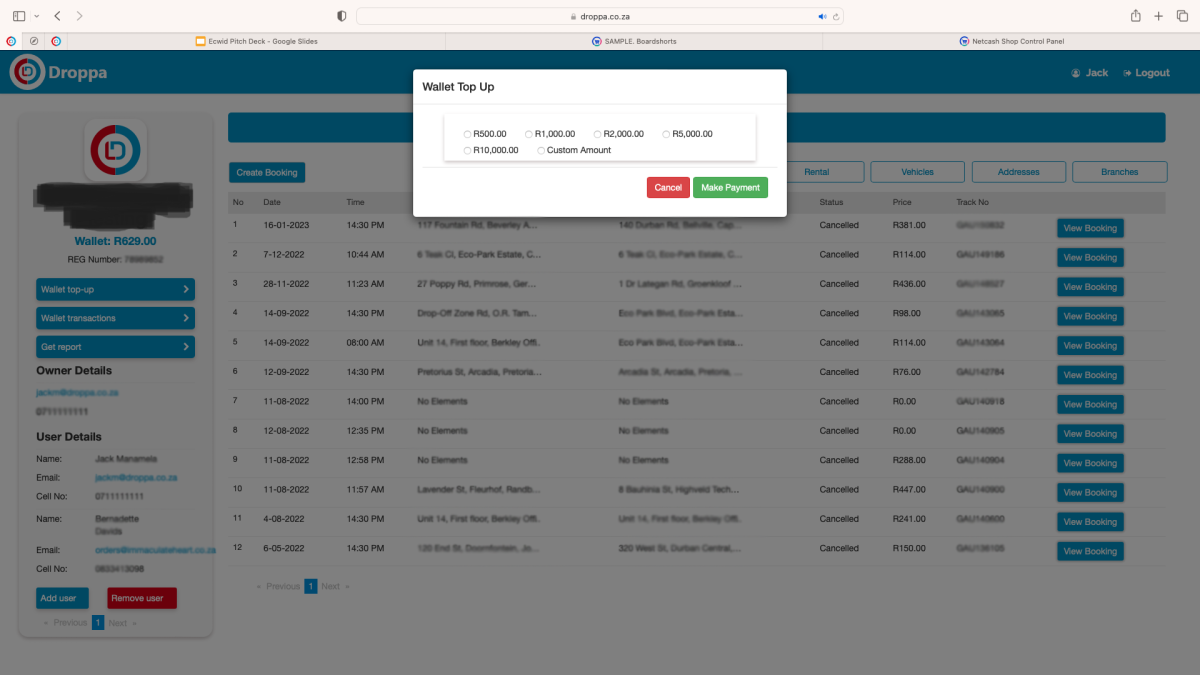
3. Select the amount you want to top up with or enter a custom amount, then click make payment.
4. Select your preferred payment method, and complete the transaction.
5. Your wallet will now display the total value available.
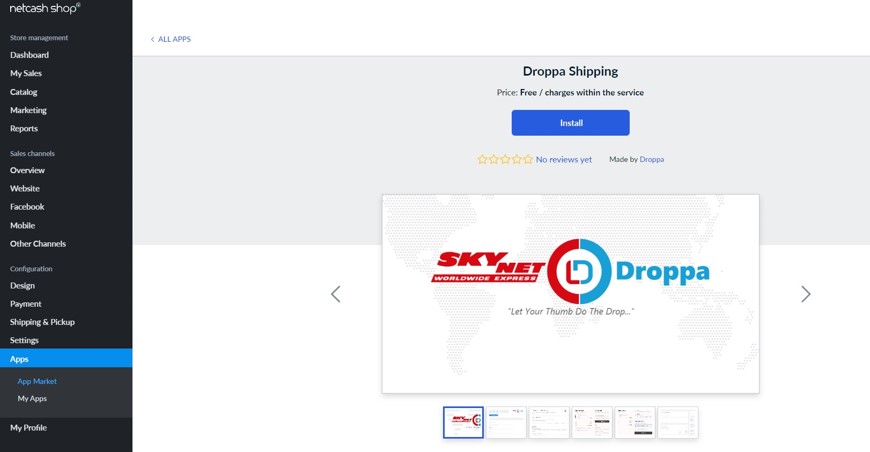
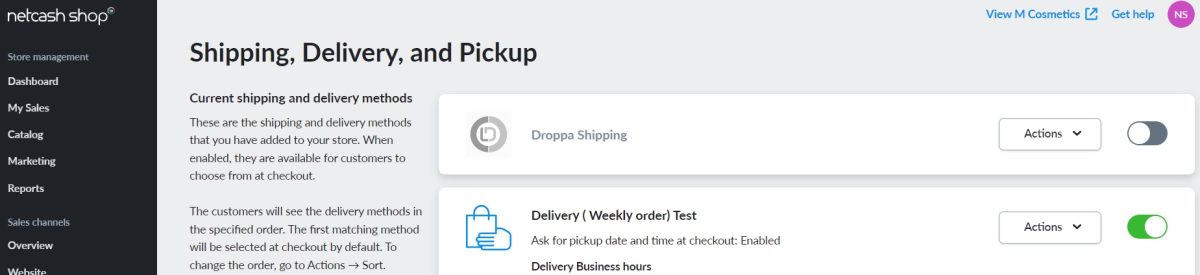
Enabling the Droppa Shipping app in your Netcash Shop
To connect your Droppa account with your Netcash Shop, you need to install and set up the Droppa Shipping app from the Netcash Shop App Market.
- In your Netcash Shop control panel, navigate to Apps > App Market and search for Droppa in the search bar.
- Select the Droppa Shipping app and click Install.
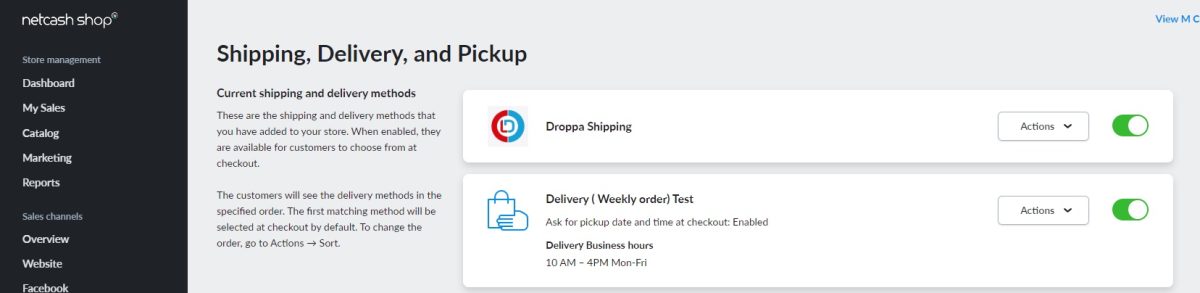
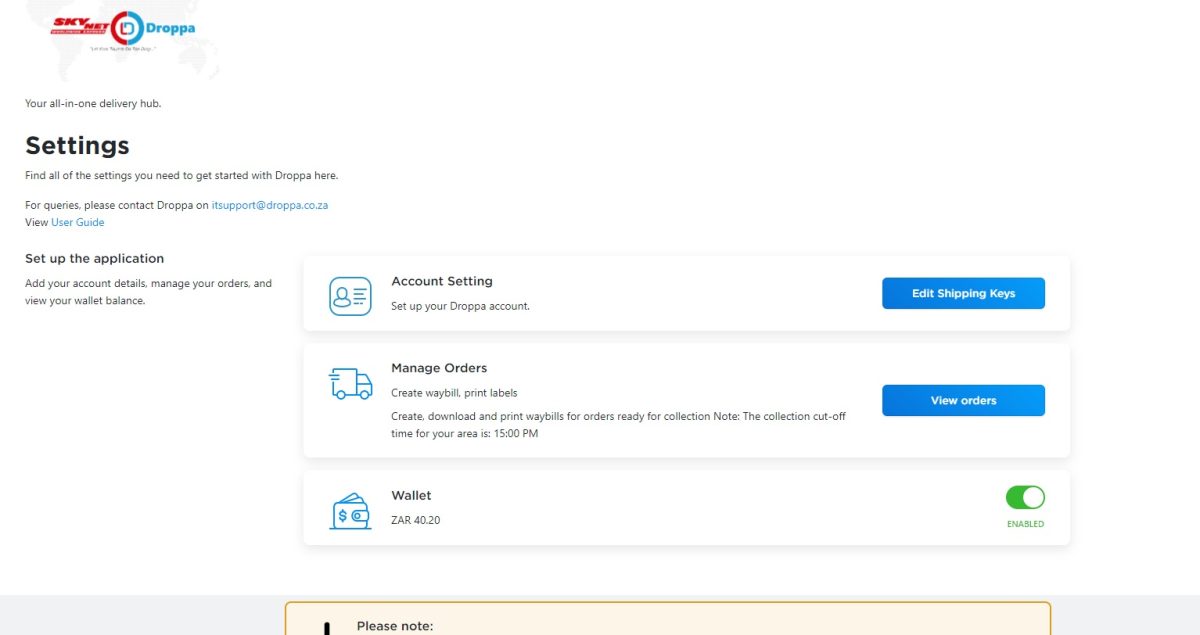
3. The app will now be available under Configuration > Shipping & Pickup in your Shop dashboard.
4. Go to the Droppa Developer’s Portal to get your unique API key and Service ID from Droppa to link your account in the app.
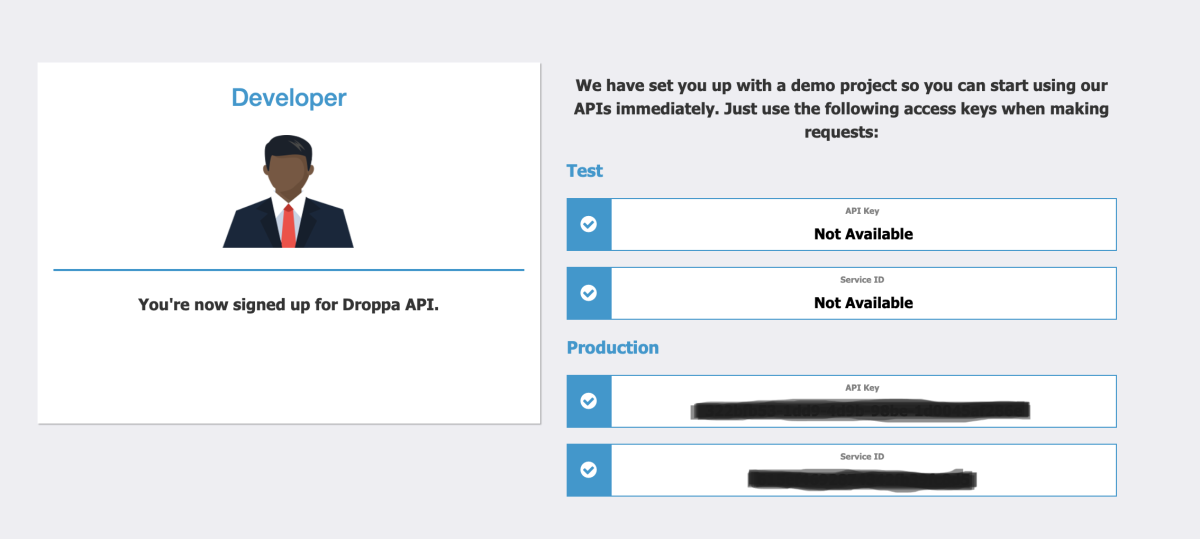
5. Use your Droppa account details to login, and copy this information into the matching fields in the Droppa Shipping app in Netcash Shop.
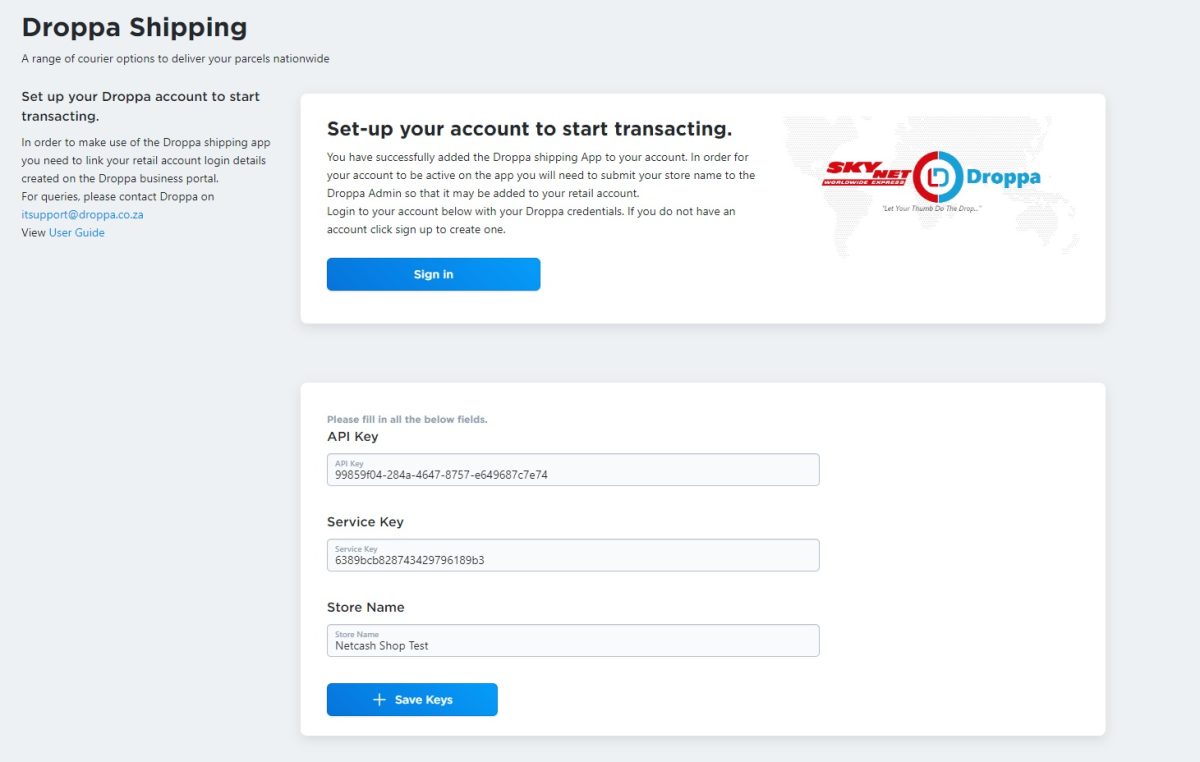
6. Click Save keys. Your account will now sync.
In the Droppa Shipping app, you should now see your wallet amount displayed (make sure the wallet toggle is switched to ‘on’), which indicates your account is connected successfully. It may take a short time to sync completely.
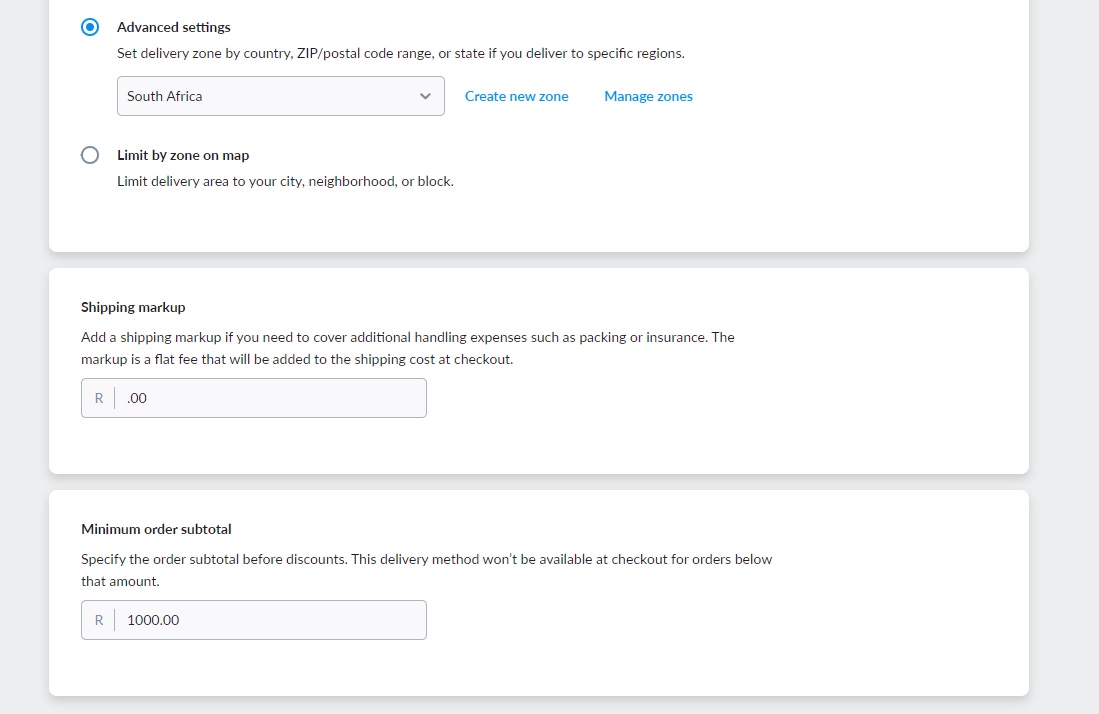
Setting up shipping zones
Droppa shipping is only available within South Africa. It’s therefore important to ensure your shipping zones are correctly set to South Africa, as well as your business’s pickup address in your Netcash Shop settings.
To set up or edit shipping zones:
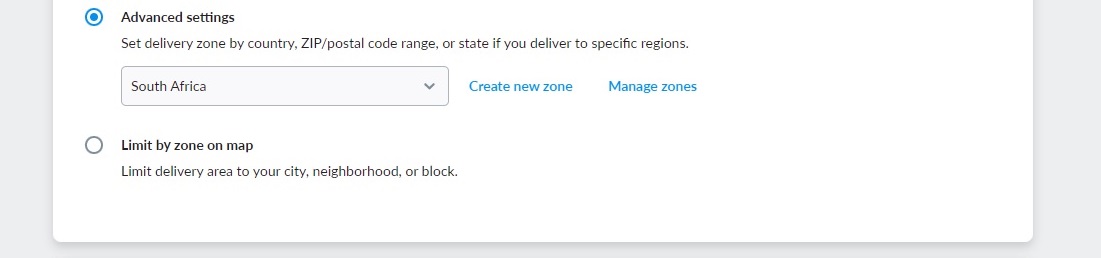
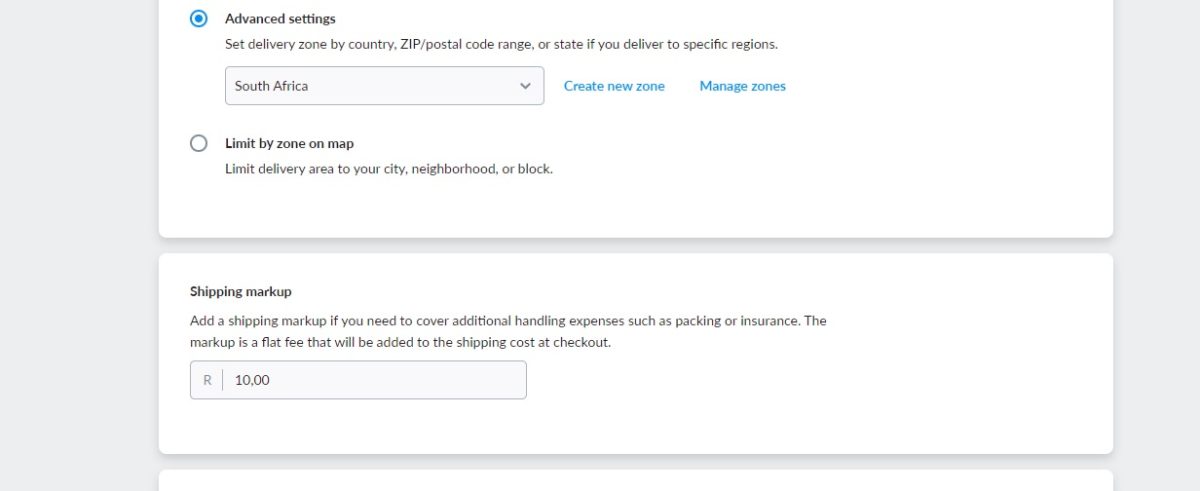
- Go to Additional settings in your Droppa Shipping app.
- In the Advanced settings section, select create new zone.
- This will open up the Destination Zones page in your Netcash Shop.

4. If you already have shipping zones setup in your store, ensure that all other regions are removed (e.g. USA) and only South Africa remains to reduce complexity.
5. If you have not yet set up shipping zones, remove any example zones that may be there and click add new zone.
6. Name the zone South Africa and add South Africa from the countries list.
7. Make sure all of the provinces are also selected. If you wish to exclude a province, simply remove it from the list.

8. Save your changes.
9. Return to the Droppa app to ensure that the Additional settings > Advanced settings are now set to South Africa in the dropdown menu.
Now, check that your business address is set up correctly.
- Go to Settings > General.
- Scroll down to the Company address section and add your business’s pick up address here, or ensure that the address is the correct one for pick up. Droppa (and other courier apps) will send their courier vans to this address to collect your orders for delivery.
- Save your changes.
Other additional settings
In your Droppa app you can also add a shipping markup or set a minimum order subtotal for this delivery method.
Adding a shipping markup will increase the default shipping cost by a specific amount. For example, if you wanted to add a R10 fee to all Droppa orders to cover the cost of packaging, you would input “R10.00” in this section.
When customers checkout and select Droppa as their delivery method, they will pay the Droppa delivery fee + R10 along with the cost of their purchase.
To only charge your customers the default Droppa delivery fee, leave this setting on R0.
To set a minimum order subtotal, add the order value you’d like customers to meet in order to use Droppa as a delivery method.
For example, if you only wanted customers to be able to use Droppa for orders of R1000.00 and more, add “R1000.00” to this section. Now, only customers who spend this value or more will see Droppa as a delivery method in checkout.
Droppa delivery options
The following delivery options are available to all customers and are set by default. You can’t add or remove these from your checkout fields.
- Budget courier service
For parcels not needing urgent delivery, to anywhere in South Africa.
Parcels are delivered in 1-3 working days in main centres and up to 5 working days for outlying areas. - Express courier service
For parcels requiring urgent delivery, anywhere in South Africa.
Parcels are delivered the next working day between main centres and 2-3 working days for outlying areas.
Delivery times for both of these courier options are between 08h00-17h00 on working days.
Courier -Options | ||||||||
AREA |
| Express Courier (24 – 72 hours) | Budget Courier (2 -5 days) | |||||
| Minimum Charge | Minimum Kg |
| Per KG Thereafter | Minimum Charge | Minimum Kg | Per KG after | |
Local | R76,00 | 5,00 |
| R4,00 | R79,00 | 5,00 | R4,00 | |
Main center | R72,00 | 2,00 |
| R27,00 | R60,00 | 5,00 | R3,50 | |
Regional | R88,00 | 2,00 |
| R37,00 | R85,00 | 5,00 | R7,50 | |
|
|
|
|
|
|
|
|
|
MiniVan-Nissan NP200, 1 ton -Nissan NP 300/Toyota Hulix,1,5 ton Kia K2700 Hyundai H100,4/6/8 Ton Hino/Man or similar | ||||||||
Testing your Droppa Shipping app in your store
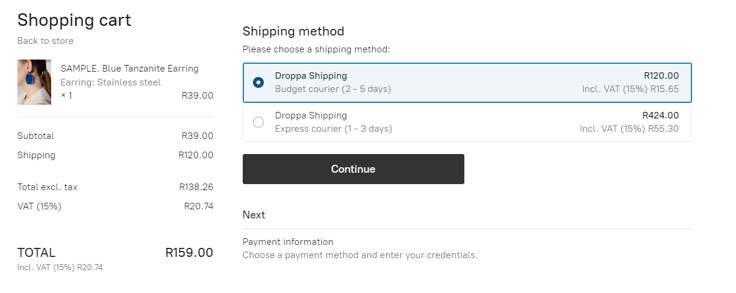
After you’ve completed the setup steps for your Droppa account and Netcash Shop, you can test whether or not Droppa is now displaying as a delivery method in your store.
To run a test:
- Go to your storefront and add any product to your cart.
- Follow the checkout steps as if you were a customer, until you reach the Delivery step.
- Make sure that the delivery address you use is within the shipping zone you set up for Droppa i.e. a South African address within a province you selected.
- Click next to move on to the delivery methods step.
- If your setup has been successful, Droppa budget and express courier options should be displayed for you to select.
- If so, you can go back on the checkout steps and cancel your order.
- If Droppa is not displayed, check your settings for shipping zones, your collection address, and any other regional settings in your store, and try again. These should all be set to South Africa and South African addresses and units of measurement.
Processing orders in your Droppa Shipping app
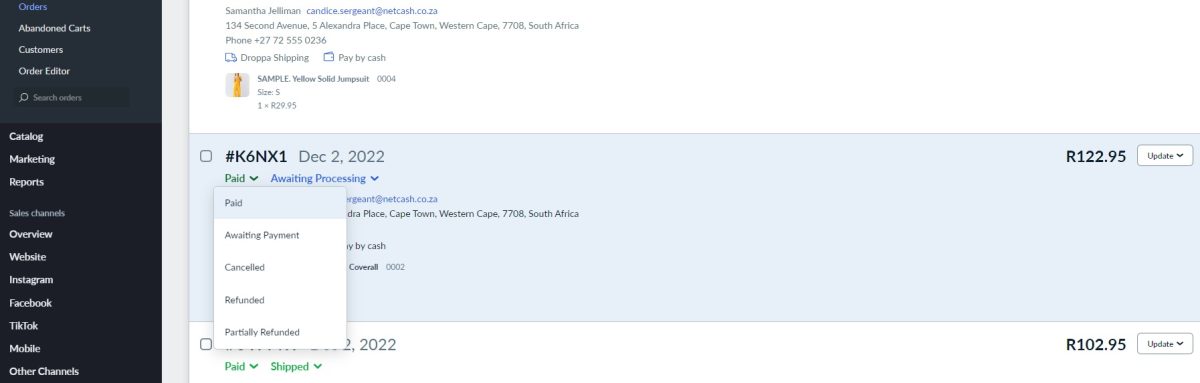
Once a customer has placed an order and selected Droppa as their delivery method, the order will display in the Manage Orders section of the Droppa app. As usual, orders will also be listed under My Sales > Orders in your Netcash Shop dashboard.
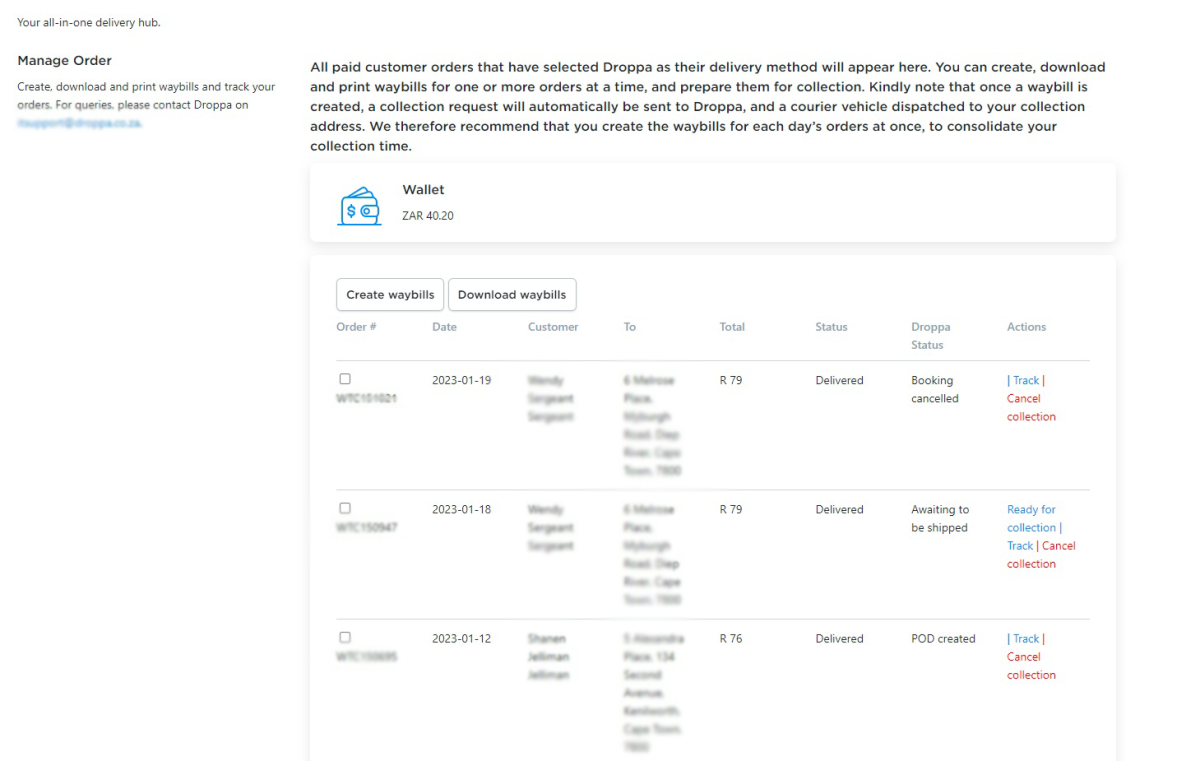
Note: Only orders with the status of Paid will display in your Droppa app dashboard.
From your Droppa app dashboard, you can process orders for collection and delivery.
- Select one or more orders using the checkboxes on the left-hand side of each order, and click Create waybills.
- You can also mark an order as ready for collection by clicking the Ready for collection option next to each order on the right-hand side.
- This will also change the Shipping status of your orders to Shipped in My Sales > Orders and notify your customers of the update to their orders.
Note: You will need to have automatic email notifications turned on in your Netcash Shop for this to happen.
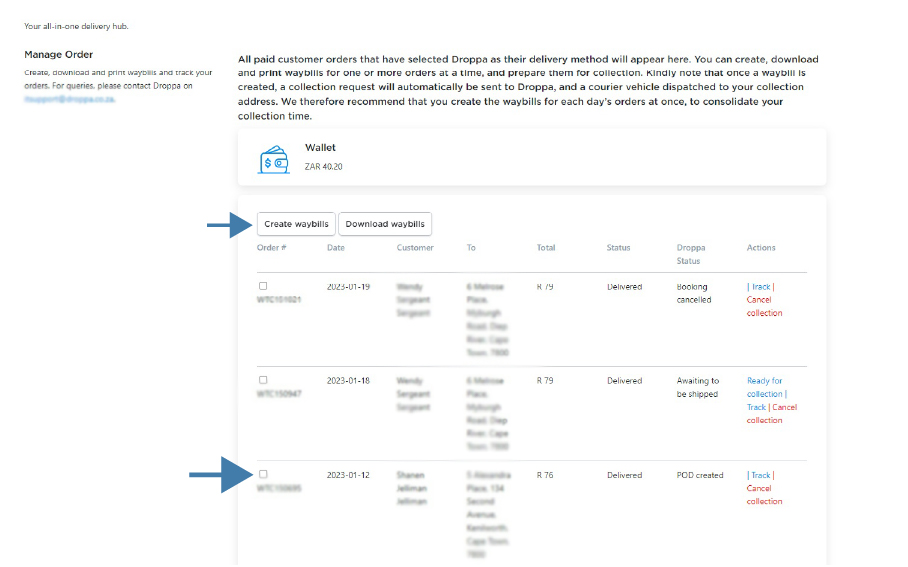
4. Once an order is processed, the delivery fee for each (displayed under the Total column per order) will be deducted from your wallet balance automatically. It’s important to ensure you have enough funds in your wallet before processing orders.
5. Once waybills are created, Droppa will automatically be notified that these are ready for collection and a driver assigned. The collection will take place on the same day or the next business day, depending on when you process the orders in the day.
6. Following the same process as step 1, you can select one or more orders and click Download waybills which will generate a PDF of the waybills (just one or all together in one document) for your orders.
7. Print the waybills and stick them on to their respective parcels. Waybills can be printed on a normal printer on A4 paper and stuck on with tape.
8. We recommend that you print a second copy of each waybill for your own records as well.
9. Prepare your parcels for collection, and hand them to the Droppa driver once they arrive.
Tracking your orders
- You can track your orders from the Droppa app dashboard by selecting the Track option, or by searching the waybill number in your Droppa business account.
- Once the order is delivered, both your Droppa app and Netcash Shop will be updated to reflect the status as Delivered.
3. Order information will also be updated with the respective waybill number for your reference. Customers will receive the waybill number in the email notifications about their order, too.
Cancelling an order
- In the event that you need to cancel an order, you can select ‘Cancel collection’ in your Droppa app’s Manage Orders dashboard.
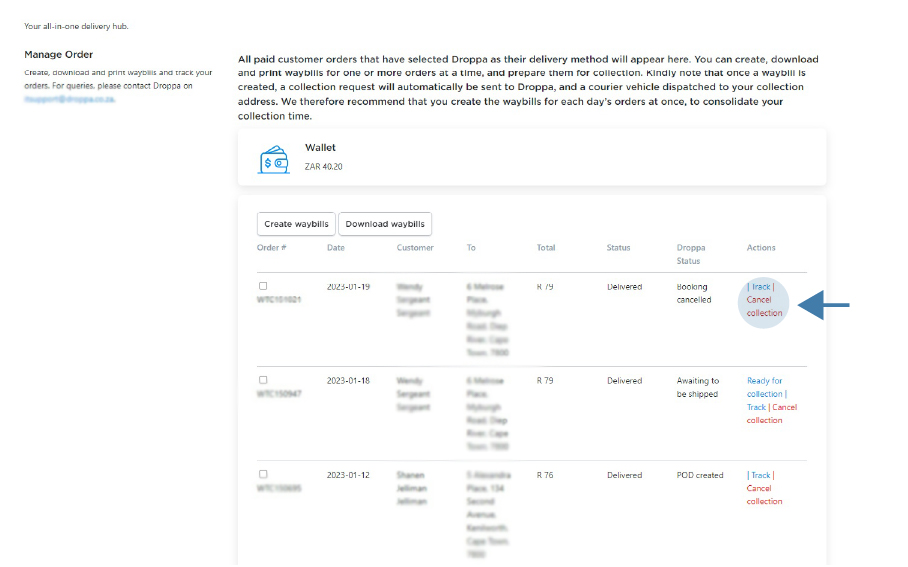
Your wallet will be credited with the delivery fee amount, and the collection cancelled. The order status will automatically update in your My Sales > Orders dashboard to ‘Cancelled’ as well, and the customer will be notified.
Note: You can only cancel an order before collection has taken place.
Getting help
For all queries about collections, deliveries, your Droppa account and assistance with linking your Droppa account with Netcash Shop, please reach out to Droppa directly:
Email: itsupport@droppa.co.za, rhulanic@droppa.co.za and thamis@droppa.co.za
In your subject line, please include “Netcash Shop” with your query.
For Droppa account support, please contact:
Customer Care: info@droppa.co.za / 021-880-2159
Removing or disabling the Droppa Shipping app
If you have discontinued your Droppa account, or would like to disable Droppa as a shipping method, you can easily do so within your Netcash Shop dashboard.
To disable Droppa as a shipping method:
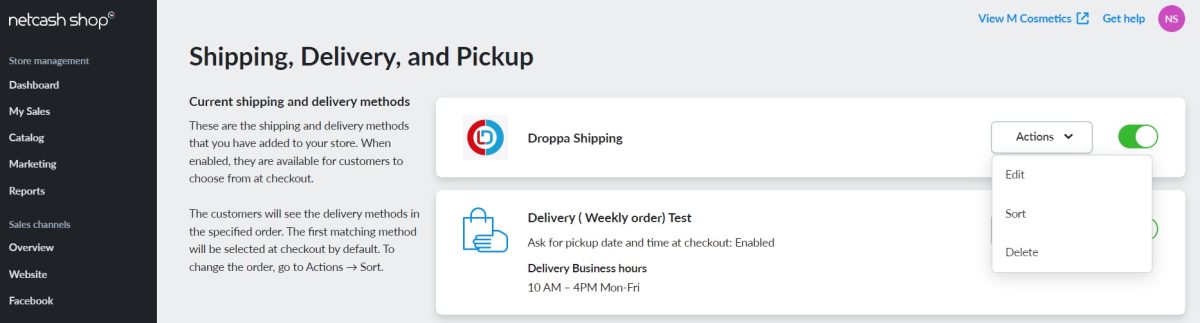
- Go to Shipping & Pickup and switch the toggle on the Droppa app to ‘off’ so that it turns grey.
Your customers will no longer be able to select Droppa as a delivery method in checkout. However, you should still be able to manage any remaining orders in the app or via your Droppa account.
If you no longer have a Droppa account or simply don’t want to use the app any longer, you can choose to delete it.
- Go to Shipping & Pickup and select the Actions drop down on the Droppa app
- Select Delete
The app will be removed and no longer appear under Shipping & Pickup or be available as a delivery method for customers in checkout.
Note that your settings will also be removed. To add the Droppa app again, simply follow the initial setup steps again to install it and connect your account.