If you have a store on WooCommerce, you can easily migrate it to Netcash Shop. Netcash Shop is a powerful e-commerce solution that allows you to add an online store to your existing website, including our built-in Netcash Payment Gateway, to start growing your customer base and sales easily.
Sign up with Netcash Shop and easily bulk export your products and categories from WooCommerce to Netcash Shop with the help of our migration tool.
Table of contents
Importing your WooCommerce catalogue to Netcash Shop
Further steps
Importing your WooCommerce catalogue to Netcash Shop
Before transferring products from your WooCommerce store, install the Ecwid (Netcash Shop) plugin for WordPress and create a Netcash Shop account if you don’t have one yet. Make sure you connect your Netcash Shop to your WordPress website after installing the plugin/creating the account.
To bulk import your WooCommerce products and categories to Netcash Shop:
- Go to your WordPress Dashboard → Tools → Import.
- Find the Netcash Shop products and categories tool and click Run Importer. Here you’ll see how many products and categories are going to be imported to your Netcash Shop store. Make sure that on your current Netcash Shop plan you can have all the products and categories imported.
- If you need to increase the products and categories limit, change your Netcash Shop plan from your WordPress Dashboard → Netcash Shop → My Profile → Billing and Plans.
- Click Import your WooCommerce catalogue to Netcash Shop.
- Click Start import.
- Click Connect.
- Click Accept to give Netcash Shop app the rights to update your catalogue.
The import will begin showing how many products and categories are going to be imported to your Netcash Shop:
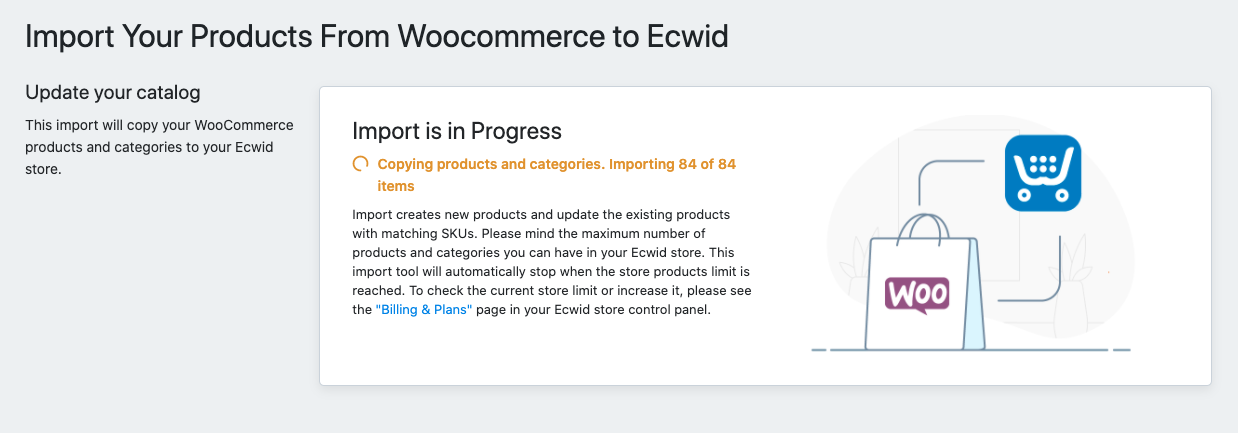
Once the import is complete, you will see how many products and categories have been imported to your Netcash Shop store.
Further steps
Now that you have created a Netcash Shop store and imported the products, we’d like to give you a quick guide on what to do next.
If you need help with setting up your store or have any questions about Netcash Shop, we are always glad to assist. Contact us.
Set up your Netcash Shop store
Take care of the basic store settings. Set up shipping and payment options, configure taxes, fill in the information about your business, and more. Check the Shop Setup guide to see the full list of things to set up.
Publish Netcash Shop products on your website
After you install the Ecwid (Netcash Shop) plugin, a new page is automatically created on your site with your store catalogue.
You can also add store categories to different site pages, highlight products in a sidebar, add Buy Now Buttons, and more. Explore all the options in this article: Adding your Netcash Shop to WordPress site.
To change the design of your storefront, refer to this guide: Customizing Netcash Shop design on a WordPress site.
Promote products to get more sales
Reach more customers and drive sales to your store by connecting Netcash Shop with multiple sales channels – popular marketplaces like Google Shopping or social media like Facebook, Instagram, and more.
Check out our Marketing checklist to learn how to promote your store effectively.