Netcash Shop easily integrates into an existing website on platforms such as WordPress, Wix, Squarespace, Joomla and many more. However, you can also migrate to Netcash Shop from another platform including Shopify, Ecwid, Woocommerce, BigCommerce, and more.
This guide will take you through migrating to Netcash Shop from another platform.
Note: When migrating to Netcash Shop, you receive the Netcash eCommerce Payment Gateway as your built-in online payment gateway for Bank EFT, Ozow Instant EFT, Credit or Debit Card, Retail Payments, Scan-to-Pay, and Visa Click to Pay, and other methods. You are not able to use any other gateways or payment methods.
Step 1: Before migration
Before you migrate to Netcash Shop, it’s important to take these steps to ensure a smooth transition.
- Sign up for a Netcash Shop account if you don’t already have one. If you have less than 10 products, you can stay on the Free plan for migration. If you have a larger product catalogue, we recommend you upgrade to a paid plan and activate your Netcash eCommerce Payment Gateway beforehand.
Note: If you are migrating from Ecwid, both your existing Ecwid account and new Netcash Shop account will need to be on a paid plan in order to migrate successfully. See our guide on how to migrate from Ecwid here.
2. Complete the initial setup of your store setup like adding your company address, company details, regional settings, and other general settings.
Step 2: Transfer your products to Netcash Shop
Now that your Netcash Shop is set up on the Free or paid plan, you can proceed with transferring your products from your current platform. Depending on which platform you’re migrating from, there are a few ways to do this:
1. Upload products
Some platforms allow you to download product data in CSV format. Most of the popular online shopping platforms like Shopify, Woocommerce, and Bigcommerce have this feature and guides on how to use them.
To import the CSV file into Netcash Shop successfully, you may need to edit the fields in a CSV editor to match Netcash Shop’s upload file format correctly. See the guide here.
2. Copy and paste data from your old store
If you only have a small amount of content, you can simply follow the steps for adding products to your Netcash Shop. You can then copy and paste product names, descriptions, meta descriptions and more from your old store, as well as upload images fairly quickly to your Netcash Shop catalogue.
3. Create an app based on the API
For very large businesses, creating an app using the Product API platform will be the quickest way to transfer across a large amount of data. You can do this with your own development team, or request custom development from the API team (costed in US Dollars) and they will create the app for you.
Note: You can upload product images individually for each product, or in bulk using the Bulk Gallery Upload app in the Netcash Shop App Market.
Step 3: Transferring customer data
There are a few different options for migrating customer data from your old store to your Netcash Shop.
1. Upload a list of customers
Similarly to uploading product data, you can export and import customer data from your old store to your Netcash shop via CSV. You can also create a new list of customer information in a spreadsheet editor, and upload it as a CSV to your Netcash Shop.
2. Create an app based on the API
You can follow the same process as with product migration, and use the Customer API Platform to migrate a large amount of customer data. You can also request this from the API team at a custom development fee.
Step 4: Complete shipping and payment configuration
Now that the most time-consuming steps are done, you can focus on setting up the rest of your store to start selling.
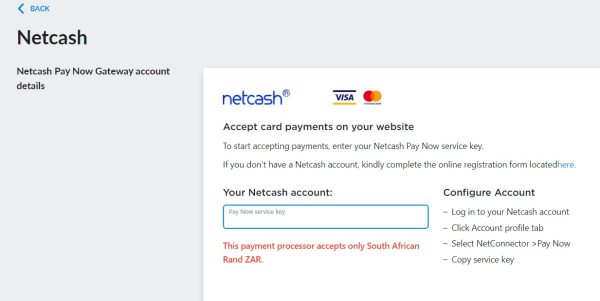
Follow this guide to start accepting online orders and payments, or simply make sure that your Netcash eCommerce Payment Gateway account is active, and your unique service key is added to the app in Configuration > Payments > Netcash. Select Edit to paste in the service key, or to check that it is already added.
To set up shipping methods for your store, follow our guide on delivery and pickup options. You can set up manual shipping methods, collection, free shipping, as well as add local courier apps from Fastway, Droppa, and others from the App Market. By using the app integrations, delivery fees are calculated automatically at checkout for your customers, depending on their location and the products in their cart.
Step 5: Add your store to a website
If you don’t have an existing website, you can create one with Netcash Shop’s free Instant Site builder. You also receive free hosting on our sub-domain, shop.netcash.co.za for your website. SSL certificates, security, backup, and more are all taken care of, too.
Follow the Instant Site set up guide to build your new website.
If you already have a website on another platform and would like to add your online store to it, you can do so using Netcash Shop’s integration features. You can also add your online store to your social media accounts (without creating a website) easily. Choose one of the guides below or use our help centre to find the guide you need.